1. Foreman Discovery 18.0 manual
This plugin enables Foreman to do automatic bare-metal discovery of unknown nodes on the provisioning network. This is often referenced as Metal-as-a-Service or simply MaaS. New nodes self-register into Foreman and upload facts collected by Facter (serial id, network interfaces, memory, disks). The registered nodes show up on Discovered Hosts page and provisioning can be initiated either manually (via UI/CLI or API) or automatically via predefined Discovery Rules.
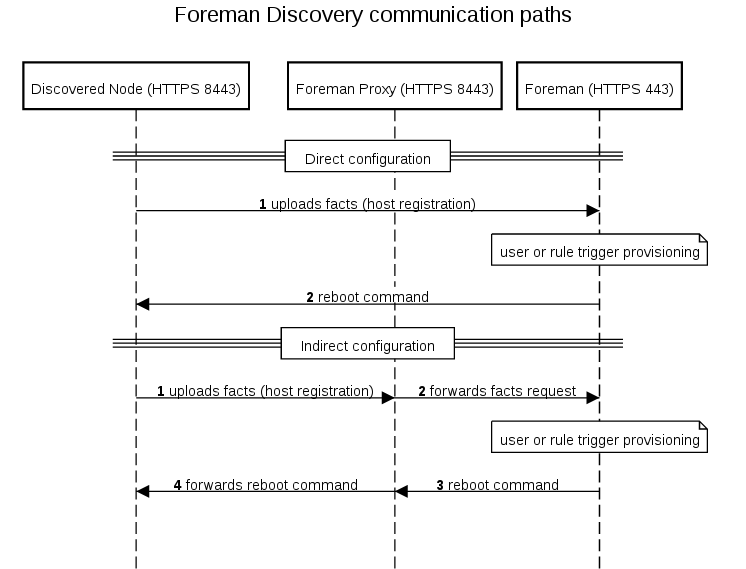
All communication can be optionally passed through Smart Proxy which has direct access both to the provisioning network and Foreman instance:
1.1 Release Notes
To read release announcements for discovery plugin, smart proxy plugin and image, visit the Release Announcement category on our site.
2. Installation
There are three different components to install: Foreman Discovery plugin, Smart Proxy Discovery plugin (aka Smart Proxy Discovery) and Foreman Discovery Image.
2.1 Foreman Discovery plugin
Foreman Discovery plugin is the main component that needs to be installed.
2.1.1 Installer (recommended)
The foreman-installer is able to automatically install the package and proceed with all necessary steps. To do this, re-run the installer with the following option:
# foreman-installer --enable-foreman-plugin-discovery
Important note: Executing foreman-installer will re-deploy all foreman-related configuration files. In case some changes have been made, proceed with manual download described below.
2.1.2 Manual installation
To install Foreman Discovery plugin, do the following
# yum install tfm-rubygem-foreman_discovery
on EL7 or
# yum install rubygem-foreman_discovery
on EL8 or
# apt-get install ruby-foreman-discovery
on Debian and Ubuntu systems.
Restart of Foreman is needed when not using the installer:
# systemctl restart foreman
2.2 Smart Proxy Discovery plugin (optional)
Smart Proxy plugin can be used to discover hosts in networks Foreman can’t directly reach itself. The plugin must be installed on all proxy hosts on the network where discovery feature is supposed to work.
To install the plugin, do
# yum install tfm-rubygem-smart_proxy_discovery
on EL7 or
# yum install rubygem-smart_proxy_discovery
on EL8 or
# apt-get install ruby-smart-proxy-discovery
on Debian and Ubuntu systems.
Smart Proxy must be restarted after plugin installation and features must be refreshed for the given Proxy in the Foreman interface (Infrastructure > Smart Proxies > a proxy > Refresh features).
2.3 Foreman Discovery Image
The image is based on CentOS 7 and about 150 MB in size. There are two ways to install the image.
2.3.1 Download via installer (recommended)
The foreman-installer is able to automatically download latest stable image. For this, re-run the installer with the following option:
# foreman-installer \
  --enable-foreman-proxy-plugin-discovery \
  --foreman-proxy-plugin-discovery-install-images=true
The command installs latest available Foreman Discovery Image. If that’s not the version required (see the compatibility table above), explicitly request to download specific version:
# foreman-installer \
  --enable-foreman-proxy-plugin-discovery \
  --foreman-proxy-plugin-discovery-install-images=true \
  --foreman-proxy-plugin-discovery-source-url=https://downloads.theforeman.org/discovery/releases/3.5/
Tip: It is possible to install both Discovery plugin and image in one installer run by providing both the options.
Important note: Executing foreman-installer will re-deploy all foreman-related configuration files. In case some changes have been made, proceed with manual download described below.
2.3.2 Manual download
Images are available for direct download To download the latest release to the expected location, do the following on Fedora and Red Hat systems:
# wget http://downloads.theforeman.org/discovery/releases/3.5/fdi-image-latest.tar \
  -O - | tar x --overwrite -C /var/lib/tftpboot/boot
Check the version number in the url against the table above. Some image-plugin combinations are not compatible.
On Debian systems, use /srv/tftp/boot instead of /var/tftpboot/boot.
2.3.3 Verify checksums
To verify extracted init RAM disk and linux kernel do:
# cat /var/lib/tftpboot/boot/fdi-image/SHA256SUM
beb3cfba7d9fb9d71481c0c8f... initrd0.img
f03bce150d2473a28697d2988... vmlinuz0
# sha256sum /var/lib/tftpboot/boot/fdi-image/*
On Debian systems, use /srv/tftp/boot instead of /var/tftpboot/boot.
2.3.4 Building own image
To build a discovery image, please visit the foreman-discovery-image git repository and find the README for further instructions.
2.4 Hammer CLI Foreman Discovery
2.4.1 Installation
Before installing make sure you have installed the hammer_cli_foreman plugin,
On Red Hat EL7 compatible systems:
yum install tfm-rubygem-hammer_cli_foreman_discovery
On Red Hat EL8 compatible systems:
yum install rubygem-hammer_cli_foreman_discovery
On Debian/Ubuntu compatible systems:
apt-get install ruby-hammer-cli-foreman-discovery
Or install from rubygems:
gem install hammer_cli_foreman_discovery
2.5 Upgrade
To upgrade Foreman Discovery follow the standard procedure of upgrading all the Foreman packages. Check Foreman Discovery global settings and PXELinux Default template.
After each upgrade, it is required to reboot all discovered hosts to load new discovery image which is compatible with the recent features added in the Foreman plugin. To do this, click on Reboot All button in the UI or do this via CLI.
3. Configuration
The following chapter covers configuration of all the components installed.
3.1 Foreman Discovery plugin
Foreman Discovery relies on intercepting the normal boot process for machines not registered in Foreman. To achieve this, the PXE default.cfg file needs to be altered to instruct new machines to boot the discovery image.
3.1.1 Default PXE templates
In the Foreman UI, go to Settings and on the Provisioning tab, set Default PXE global template entry to discovery instead of local. This enables booting discovery for unknown hosts. To commit the change, click on Build PXE Default button.
This only works for Foreman 1.18 or higher, for older versions go to Provisioning Templates, edit (or clone) PXELinux global default template and change the default entry from localboot entry to Discovery:
ONTIMEOUT discovery
Similar change is needed in PXEGrub2 global default template:
default=discovery
PXEGrub1 global default must be changed in the same way, but this is a legacy bootloader not in wide use anymore. In that case provide the number of the discovery menu entry (starting from 0) as Grub1 does not accept menu titles.
To commit the change, click on Build PXE Default button to deploy the template. The template already contains a menu entry rendered from pxelinux_discovery snippet which looks like:
LABEL discovery
MENU LABEL Foreman Discovery Image
KERNEL boot/fdi-image/vmlinuz0
APPEND initrd=boot/fdi-image/initrd0.img ... proxy.url=<%= foreman_server_url %> proxy.type=foreman
IPAPPEND 2
Similarly, this is also rendered for Grub2 and Grub1. The following files are created on all associated TFTP servers:
pxelinux.cfg/defaultgrub2/grub.cfggrub/grub.cfg
The proxy.type option can be either proxy or foreman. In the first case all communication goes through Smart Proxy, in the latter case the communication goes directly to Foreman (legacy mode). This is the default when not specified.
The proxy.url specifies URL of the Smart Proxy or Foreman depending on the previous setting. For backward compatibility, foreman.url is an alias for this setting.
If direct connection is not possible, enable Smart Proxy Discovery plugin (see above) to forward communication and configure the APPEND line in the following way:
APPEND ... proxy.url=https://FOREMAN_PROXY_INSTANCE:8443 proxy.type=proxy
Alternatively, the Discovery image also searches for DNS SRV record named _x-foreman._tcp. If the DNS server is configured for this (see the example for ISC BIND below), then it is not required to provide foreman.url at all, but proxy.type is still required if the SRV record is configured to point to a proxy.
Here is an example of ISC BIND configuration statement to set foreman A record to be used with HTTPS protocol.
_x-foreman._tcp SRV 0 5 443 foreman
You can mix both approaches and override SRV record with the command line.
It is important to keep IPAPPEND 2 option which is key configuration option to detect interface connected to provisioning network. Also never change or remove root option, otherwise image will not boot properly.
It is important to know that DNS servers from DHCP are taken into acount for only for the interface that was specified via the BOOTIF option. This means when a system has multiple NICs, DNS will work for the correct interface - the one that was booted from.
3.1.2 Update PXE default template
Once the template has been updated, click the Build PXE Default button at the top of the Provisioning Templates page. This will instruct the TFTP proxy to rewrite the pxelinux.cfg/default file.
Repeat this step every time a change is made to the default template.
3.1.3 Organizations and Locations
If Locations and/or Organizations are enabled, Foreman assigns Organization and Location to discovered hosts according to the following rules from top to bottom:
-
According to the
discovery_organizationordiscovery_location, if present. These can be set under Administer > Settings > Discovered. -
If
foreman_organizationorforeman_locationfact is present, set accordingly. Fact names which are looked up can be configured in Administer > Settings > Puppet section as Organization/Location fact setting. -
If Subnet was determined for particular discovered host, use the first Organization and Location associated with the Subnet.
-
Select the first Organization / Location ordered by title (name the org/loc was created with). This is a workaround until we fix provisioning of discovered hosts without taxonomy.
Organization or Location can be changed via the “bulk actions” menu which appears once once or more discovered hosts are selected.
3.1.4 Global settings
-
Interface fact - Fact name to use for primary interface detection. It specify which incoming fact should be used to get the MAC address. By default, the PXELinux BOOTIF kernel command line option is used which gives the MAC address of the interface which was booted from.
-
Auto provisioning - Automatically provision newly discovered hosts, according to the provisioning rules. Note it is set to false by default. If you want to trigger provisioning automatically with rules, you need to turn this setting on. It’s recommended to try provision manually first to test before proceeding.
-
Fact columns - Extra facter columns to show in host lists. It is possible to add any fact reported by Facter via this global option onto the Discovered Hosts page table as a new column. To do that, set the value of this setting to name of a fact reported. To hide the new column, set to a blank value. To show multiple columns, separate fact names by comma.
-
Clean all facts - Clean all reported facts during provisioning (except discovery facts).
-
Hostname facts - List of facts to use for the hostname (separated by comma, first wins).
-
Reboot - Automatically reboot or kexec discovered host during provisioning.
-
Hostname prefix - The default prefix to use for the host name, must start with a letter.
-
Highlighted facts - Regex to organize facts for highlights section - e.g. ^(abc|cde)$.
-
Storage facts - Regex to organize facts for storage section.
-
Software facts - Regex to organize facts for software section.
-
Hardware facts - Regex to organize facts for hardware section.
-
Network facts - Regex to organize facts for network section.
-
IPMI facts - Regex to organize facts for ipmi section.
-
Lock PXE - Automatically generate PXE configuration to pin a newly discovered host to discovery.
-
Locked template name - PXE template to be used when pinning a host to discovery. Each individual PXE template (PXELinux, PXEGrub, PXEGrub2) has its own entry.
-
Force DNS - DNS entry will be created when provisioning discovered host.
-
Create bond interfaces - automatically create a bond interface from interfaces in the same vlan based on lldp
3.1.5 Discovery image kernel options
Foreman discovery image currently recognizes the following list of configuration options:
- proxy.url - URL to Foreman or Proxy (if omitted DNS SRV lookup is made)
- proxy.type - endpoint type: “foreman” or “proxy”
- fdi.zips - extensions to download
- fdi.zipserver - override TFTP server reported by DHCP
- fdi.initnet=all/bootif - initialize all or pxe NICs (default) during startup
- fdi.ssh - configure ssh daemon after start (1 to enable)
- fdi.rootpw - configure ssh daemon password (plain string)
- fdi.countdown - initial countdown in seconds before registration attempt (45 by default)
- fdi.uploadsleep - seconds between facter runs (30 by default)
- fdi.cachefacts - number of fact uploads without caching (0 by default)
- fdi.px* - PXE-less workflow (described below)
- fdi.dhcp_timeout - DHCP NetworkManager timeout in seconds (300 by default)
- fdi.ipwait - wait time for IP to be available in proxy SSL cert start (120 by default)
- fdi.nmwait - nmcli –wait option for NetworkManager (120 by default)
- fdi.dns_nameserver - nameserver to use for DNS SRV record
- fdi.proxy_cert_days - number of days HTTPS self-signed cert is valid (999 by default)
- fdi.dns_search - search domain to use for DNS SRV record
- fdi.dns_ndots - ndots option to use for DNS SRV record
- fdi.vlan.primary - VLAN ID to set for primary interface
By default, the image tries to send initial facts multiple times. Delay
between facter runs can be changed with fdi.uploadsleep. Once facts are
successfully sent to Foreman server, additional uploads are done only on
hardware configuration change (e.g. disk drive is added). It is possible to
force arbitrary amount of uploads via fdi.cachefacts option. Reasonable
value is 2-3 and also increase fdi.uploadsleep to more than 60 seconds to
prevent race conditions when provisioning hosts (host could be discovered
second time when provisioning window is hit).
3.2 Smart Proxy Discovery plugin
Make sure foreman_url setting is present in the Smart Proxy configuration file.
# grep foreman_url /etc/foreman-proxy/settings.yml
:foreman_url: https://FOREMAN_HOST
This should by done automatically by our installer. It is a good idea to check if the host responds properly and there are no firewalls blocking the communication.
3.2.1 Subnet proxy setup
All subnets with discovered nodes need this specified in Foreman so it connects via the Smart Proxy. To do this, go to Infrastructure > Smart Proxies and verify if the desired proxy lists Discovery feature. If not, click on Refresh features button and it will appear immediately.
In Infrastructure > Subnets select the desired Discovery Proxy for each appropriate Subnet.
Make sure that lease pool (defined in ISC DHCP configuration) and reservation pool (defined in Infrastructure > Subnets) are disjoint. More on that topic in the installation scenarios section.
3.3 Hammer CLI Foreman Discovery plugin
The plugin must be enabled in cli.modules.d/foreman_discovery.yml
(see Hammer config directories)
as follows:
:foreman_discovery:
    :enable_module: true
3.4 Permissions
The plugin will create a Role called Discovery when first started. This can be
assigned to roles for non-admins to allow them to use the discovery plugin.
Alternatively assign the perform_discovery permission to an existing Role.
4. Usage
Foreman Discovery plugin provides user interface, API and CLI.
4.1 Hardware discovery
Boot a machine in any provisioning network that was configured with the default PXE configuration above. It should register with Foreman and appear in Hosts > Discovered Hosts.
4.2 Manual provisioning
Select a discovered host and choose Provision. This will redirect to the normal Edit page for a Host, with the discovered data filled in where possible. Fill in the details as normal.
On save, Foreman modifies the host’s PXELinux file on the TFTP server and reboots the discovered host, after which it boots into an installer for the chosen OS, and finally into the installed OS.
Delete a machine and reboot it to have it move back to the Discovery Pool.
4.3 Automatic provisioning
Starting with version 2.0, it is possible to predefine provisioning rules which will assign host group to provisioned hosts and trigger provisioning automatically. To do that, head over to Configure > Discovery rules and create such a rule:
- Name represents rule name shown to the users. It must not contain spaces or non-alphanumeric characters.
- Search statement is used to match discovered hosts for the particular rule. Use Scoped Search syntax to define it. Examples are shown below.
- Host Group is assigned to a matching host before starting provisioning process. It is very important the selected Host Group has all the required parameters set (domain, subnet, root password), otherwise provisioning process will fail.
- Hostname defines a pattern to assign human-readable hostnames to the
matching hosts. When left empty, hostname is assigned in a form of
macMACADDRESSby default. The same syntax as for provisioning templates is used. See below for more information and examples. - Hosts limit enables to limit maximum amount of provisioned hosts per rule. If a limit was reached, the rule will not take effect until one or more hosts are deleted. Typical use case are rules per server rack or row when it is necessary to change provisioning parameters like hostname or host group per each entry.
- Priority specifies order in which rules are applied. Must be greater than zero. Rules with lower priority number win. Rule that was created first wins in case of equal priority.
- Enabled flag is used for temporary shutdown of rules.
- Organizations\Locations discovered hosts can only auto provision from rules in the same organization/location as the discovered host. Host group taxonomy is enforced, therefore it is not possible to provision into a host group that is not associated with the discovery rule.
Once some rules are defined, the good practice is to discover a host and apply the rules using Auto discover button on the host.
By default, Foreman does not trigger auto discovery automatically. This must be explicitly turned on in Administer > Settings > Discovered > discovery_auto.
4.3.1 Search syntax
Easiest way of testing search patterns is in Discovered hosts list, because the search box gives the same results. Typical search fields are facts, they all start with “facts.”. Auto completion can be used to browse the facts as well as discovered hosts detail screen. Typical search queries:
facts.architecture = x86_64
facts.bios_vendor ~ 'Dell*'
facts.macaddress = "aa:bb:cc:dd:ee:ff"
facts.macaddress_eth0 = "aa:bb:cc:dd:ee:ff"
facts.ipaddress_eth1 ~ "192.168.*"
facts.discovery_proxy_uri = "https://my_proxy:8443"
As of Foreman 1.7, all the facts are currently simple strings, so it is not possible to do numeric comparisons.
Some important facts are extracted and converted to numbers. These are:
- cpu_count - number of CPUs
- disk_count - number of disks attached
- disks_size - total amount of disk space (in MiB)
Possible queries are:
cpu_count >= 8
disk_count < 10
disks_size > 1000000
See the searching section for more information.
4.3.2 Hostname patterns
The target hostname template pattern has the same syntax as in Provisioning Templates (ERB). Domain will be appended automatically. A hostname based on MAC address will be used when left blank. In addition to @host attribute function rand for random integers is available. Examples:
application-server-<%= rand(99999) %>
load-balancer-<%= @host.facts['bios_vendor'] + '-' + rand(99999).to_s %>
wwwsrv-<%= @host.hostgroup.name %>
minion-<%= @host.discovery_rule.name %>
db-server-<%= @host.ip.gsub('.','-') + '-' + @host.hostgroup.subnet.name %>
When creating hostname patterns, make sure the resulting host names are unique. This is very important. Hostnames must not start with numbers. A good approach is to use unique information provided by facter (MAC address, BIOS or serial ID) or to randomize the hostname somehow.
4.4 Hammer CLI Foreman Discovery plugin
Confirm your setup by running hammer -h and check that the discovery command is listed.
$ hammer -h
...
Subcommands:
 ...
 discovery                     Discovery related actions.
 ...
...
The actions you can use with discovery will appear as follows:
$ hammer discovery -h
Usage:
    hammer discovery [OPTIONS] SUBCOMMAND [ARG] ...

Parameters:
 SUBCOMMAND                    subcommand
 [ARG] ...                     subcommand arguments

Subcommands:
 auto-provision                Auto provision a host
 delete                        Delete a discovered host
 facts                         Show a discovered host
 info                          Show a discovered host
 list                          List all discovered hosts
 provision                     Provision a discovered host
 reboot                        Reboot a host
 refresh-facts                 Refresh the facts of a host

Options:
 -h, --help                    print help
For example to reboot a discovered_host:
$ hammer discovery reboot -h
Usage:
    hammer discovery reboot [OPTIONS]

Options:
 --id ID
 --name NAME                   Name to search by
 -h, --help                    print help

$ hammer discovery reboot --id 130
Host reboot started
5. Extending the image
It is possible to extend the Foreman Discovery Image with custom facts, software or device drivers easily. There are two ways of doing that.
5.1 Runtime extensions
It’s possible to provide a zip file containing extra code for the image to use. First, create a directory structure like:
.
├── autostart.d
│   └── 01_zip.sh
├── bin
│   └── ntpdate
├── facts
│   └── test.rb
└── lib
    ├── libcrypto.so.1.0.0
    └── ruby
        └── test.rb
autostart.d contains scripts that will be executed in POSIX order by the
image as it starts up, before the host is registered to Foreman. bin is
added to PATH, you can place binaries here and use them in the autostart
scripts. facts is added to FACTERLIB so that custom facts may be
configured and sent to Foreman. lib is added to LD_LIBRARY_PATH and
lib/ruby is added to RUBYLIB, so that binaries in bin can be executed
properly.
Environment variables (PATH, LD_LIBRARY_PATH, RUBYLIB and FACTERLIB) are
appended to. If you need to specify the path to something explicitly in
your scripts, the zip contents are extracted to /opt/extension on the
image.
An example structure is provided in example_zip in this repo. You can zip
up your structure with zip -r my_extension.zip .
You can create multiple zip files, but be aware they will be extracted to the same place on the discovery image, so files in later zips will overwrite earlier ones if they have the same filename.
To inform the image of the extensions it should use, place your zip(s) on
your TFTP server along with the discovery image, and then update your
PXELinux APPEND line with fdi.zips=<path-to-zip>,<path-to-zip>, where the
paths are relative to the TFTP root. So if you have two zips at
$TFTP/zip1.zip and $TFTP/boot/zip2.zip, you would use
fdi.zips=zip1.zip,boot/zip2.zip.
5.2 Image building with extensions
The very same ZIP file with the structure described above can be injected into your own image. This is useful for network drivers when there is a chicken and egg problem.
To build a discovery image with extensions, please visit the foreman-discovery-image git repository and find the README for further instructions.
5.3 PXE-less discovery
It is possible to use the Discovery image directly as a CDROM/DVDROM ISO that can be also transferred to hard drive or USB stick. Download the image from our site and transfer it onto a flash drive:
wget http://downloads.theforeman.org/discovery/releases/3.5/fdi-bootable-3.5.X.iso
dd if=fdi-bootable-3.5.X.iso of=/dev/sdx
In this case, automatic discovery process is not started automatically and the user can select the primary network interface interactively. On the next couple of screens, the user configures network credentials (IPv4 supported at the moment), the URL and type (Foreman or Smart Proxy), and fills custom user facts which are then uploaded to the server. These custom facts can be used with pre-defined discovery rules to let users automatically build hosts.
Image sends special “kexec” fact (flag) along standard and user facts which is a signal to Discovery plugin to initiate kexec reload instead of reboot. When the host is provisioned either manually or via discovery rule, instance loads installer via kexec utility.
This interactive mode is also available when image is PXE booted, user must cancel initial splash screen countdown with a key to get there.
Currently there is no authentication in the workflow (the same applies for normal discovery process), but it is possible to define own custom facts named “token” or “password” to secure PXE-less provisioning.
Before a system can be discovered without PXE there must be a discovery rule associated with a hostgroup having an OS associated with a “kexec” template kind. This template is used to pass in parameters for kexec call (kernel, initrd, append line). Discovery ships with templates for Red Hat and Debian distributions at the moment.
Make sure the associated provisioning template is configured with static networking, if the deployment does not provide DHCP services, otherwise Anaconda will fail to install the system after kernel reload. Also check if netmask, gateway and primary DNS server is present on the associated Subnet.
Some graphic drivers renders console unusable after kexec. From image version 3.4.4 all KMS drivers were removed and kernel uses the default VGA 80x25 mode. Frozen console or graphic artifacts can be solved by choosing a different driver when using virtualization or selecting older hardware emulation version (VMWare version 4 or 5). When reporting graphic driver issues, attach “lsmod” output from discovered nodes and try to blacklist “kms” drivers as a workaround.
5.3.1 Unattended and semi-automatic mode
All interactive screens can be fully automated via kernel command line that can be either entered during SYSLINUX/Grub2 boot screen or burnt into the image (see below). Options are self-explanatory:
proxy.url=https://foreman:443
proxy.type=foreman
fdi.pxmac=aa:bb:cc:dd:ee:ff
fdi.pxip=192.168.122.42/24
fdi.pxgw=192.168.1.1
fdi.pxdns=192.168.1.1
fdi.pxfactname1=security-token
fdi.pxfactvalue1=987123
fdi.pxfactname2=deployment
fdi.pxfactvalue2=db-server
fdi.pxfactnameN=
fdi.pxfactvalueN=
When px.ip and/or px.gw are omitted, image tries to acquire network credentials over DHCP, which can be useful in PXE-less environments with DHCP server deployed. Therefore the absolute minimum set of options in this case is:
proxy.url=https://foreman:443
proxy.type=foreman
fdi.pxmac=aa:bb:cc:dd:ee:ff
All values must be confirmed in the text-user interface first, which gives semi-automatic behavior. To initiate the provisioning without any question (unattended mode or fully automatic), add the following option:
fdi.pxauto=1
When fdi.pxauto is not provided, Ok/Next buttons are always focused first on all screens therefore it is easier to walk through.
The pxmac option defines the provisioning interface to be used to acquire network credentials (optionally) and send facts. If omitted in unattended mode, the first NIC with link is picked up (in alphabetical order by network identifier in case of multiple items). In semi-automated mode, screen will appear to select the correct interface.
5.3.2 Remastering Discovery Image
Unattended and semi-automatic mode described above requires some kernel command line options to be present. To avoid typing them in in PXELinux/Grub2 loaders, it is possible to re-master the discovery image “burning” the options into the image.
Helper script called discovery_remaster is being shipped with the foreman_discovery plugin. It can be used to make a copy of the ISO image with additional kernel command line options. Usage is simple:
sudo discovery-remaster fdi-bootable-3.5.X.iso "fdi.pxip=192.168.100.68/24 fdi.pxgw=192.168.100.1 fdi.pxdns=192.168.100.1 proxy.url=https://192.168.100.1:8443 proxy.type=proxy fdi.pxfactname1=myfact fdi.pxfactvalue1=somevalue fdi.pxmac=52:54:00:be:8e:8c fdi.pxauto=1"
The above command creates a copy in the same directory with date/time stamp in the name.
5.3.2 Example workflows
Provisioning without PXE/DHCP
- Setup auto-provisioning rules (optional)
- Transfer the ISO image onto an USB stick or CDROM and boot it.
- Select Manual network setup
- Select primary (provisioning) interface if the host has multiple NICs
- Enter IPv4 credentials
- Enter Foreman (Smart Proxy) credentials
- Provide custom facts and click on Confirm
- The host is discovered
- The host reloads kernel into installer either manually or via auto-provisioning
Provisioning with DHCP (no PXE)
- Transfer the ISO image onto an USB stick or CDROM and boot it.
- Select Discover with DHCP
- Select primary (provisioning) interface if the host has multiple NICs
- Enter Foreman (Smart Proxy) credentials
- Provide custom facts and click on Confirm
- The rest is same as in the example above (without DHCP)
Semi-automated workflow w/o PXE/DHCP
- Modify the discovery ISO with the following options:
- fdi.pxgw=192.168.1.1
- fdi.pxdns=192.168.1.1
- proxy.url=https://foreman:443
- proxy.type=foreman
- fdi.pxfactname1=deployment_type
- fdi.pxfactvalue1=database_server
- Transfer the ISO image onto an USB stick or CDROM and boot it.
- Select primary (provisioning) interface if the host has multiple NICs
- Enter IPv4 credentials (gateway and DNS is already populated)
- Select primary (provisioning) interface
- Enter Foreman (Smart Proxy) credentials
- Provide custom facts (the first is pre-populated) and click on Confirm
- The rest is same as in the examples above
Fully automated workflow w/o PXE/DHCP
- Modify the discovery ISO and set all required options including MAC and IP address
- Make sure the fdi.pxauto option is set to 1
- Transfer the ISO image onto an USB stick or CDROM and boot it.
- Discovered node automatically uploads facts and reloads kernel into installer.
5.4 Running arbitrary commands after boot
Discovery version 3.5 or above supports running arbitrary commands (or short
shell scripts) provided via fdi.script kernel command line option. The script
must be BASH shell compressed via gzip and encoded in base64. To create the
option, run:
# cat aux/basescript-examples/myscript | gzip -9 | base64 -w0
fdi.script=H4sIAK4hZ1oCA0tNzshXUA/JyCxWAKJEhZLU4hJ1LgA92U9qFgAAAA==
Keep in mind that kernel command line option is limited, Red Hat Enterprise
Linux 7 (or CentOS 7) has limitation of 2048 characters and there are already a
lot of characters, so in practice the script option must be shorter than this in total.
When it exceeds the threshold, the rest of the kernel command
line option will be ignored, therefore it will likely fail. Typically the script
can be used to download a larger script using curl command from a remote
HTTP(s) server.
The script is executed during the initial boot in parallel with other
services. Although the service unit is scheduled to start after network is
initialized, the connection might not be fully available so make sure to put
some sleep command if you encounter network issues.
6 Help
Please follow our standard procedures and contacts. For problems with the image, send us the output of the following command for a running discovered node (see below how to get access to the shell):
# discovery-debug
6.1 Troubleshooting
If you find a bug, please file it in Redmine.
See the troubleshooting section in the Foreman manual for more info.
6.1.1 Troubleshooting plugins
If the booted machine fails to register with Foreman, then there are a number of common causes:
- Machine did not boot the correct image
- Check your default PXE Linux template and try to re-deploy it
- Check your pxelinux.cfg/default configuration file on the TFTP Proxy
- Machine booted image but failed to contact Foreman
- Check the proxy.url and proxy.type options
- Check DNS is working for that image, or use an IP in proxy.url
- Check DHCP is handing IPs to the booted image correctly
- Discovered node does not reboot
- Check the connection between Foreman and Proxy, Proxy and Node
- For PXE-less discovery verify that kexec template was associated with the OS
6.1.2 Troubleshooting the image
First of all make sure your server (or VM) has more than 500 MB of memory because less memory can lead to various random kernel panic errors as the image needs to be extracted in-place (150 MB * 2).
The first virtual console is reserved for logs, all systemd logging is shown there. Particularly useful system logs are tagged with:
- discover-host - initial facts upload
- foreman-discovery - facts refresh, reboot remote commands
- nm-prepare - boot script which pre-configures NetworkManager
- NetworkManager - networking information
The root account and ssh access are disabled by default, but you can enable ssh and set root password using the following kernel command line options. Simply add these to the APPEND line of the pxe template:
fdi.ssh=1 fdi.rootpw=redhat
Use tty2 console (or higher) to login onto a discovered host.
6.1.3 Blacklisting drivers
Since the image is based on CentOS 7, all kernel options are valid and should
work normally, including modprobe.blacklist to blacklist a driver in init
RAM disk.
6.1.4 Initial restart problem
In typical Foreman workflow, hosts are set to always boot from the network via PXE. Unknown hosts boot into Discovery while known hosts boot into installer or boot from hard drive when in operation mode.
Some users use Discovery plugin on virtualized platforms. Hypervisors tend to treat the initial restart in a special way to allow comfortable OS installation. They usually attempt to change boot order to first hard drive instead of CD-ROM or PXE which was only used for the installation.
There is a known issue with libvirt which turns VM off instead of rebooting it
which causes problems when using Discovery. To avoid this behavior and to
align with recommended workflow, new VMs must be created with PXE booting
only. In Virt Manager, click on Customize options and set the boot order
explicitly. When using virt-install, do not provide --pxe option and set
boot order explicitly with --boot network instead.
6.2 UEFI
Discovery Image version 3.0.0 and older does support booting via EFI thanks to Grub 2 which is present on the media alongside SYSLINUX. Remastered images preserve this capability as well.
6.3 List of facts reported
Additional facts reported by discovery image which sent along information collected by facter:
discovery_bootif- primary interface MAC addressdiscovery_version- version tagdiscovery_release- release tag (build date)discovery_proxy_uri- proxy URL that was configured via command linediscovery_proxy_type- proxy type that was configured via command line
Extra facts which are sent along additional facts reported in PXE-less mode:
discovery_kexec- kexec utility versiondiscovery_ip_cidr- IP address in CIDR formatdiscovery_ip- IP address (plain)discovery_netmask- network addressdiscovery_gateway- gateway addressdiscovery_dns- DNS server (primary one)
6.4 Contributing
Follow the same process as Foreman for contributing.