1. Foreman Remote Execution 0.0 Manual
This plugin enables Foreman to run arbitrary commands on hosts using different providers. Initially only SSH provider is supported but we plan to add more. Communication goes through Smart proxy so Foreman does not have to have direct access to the target host and can scale to control many hosts. A command can be customized similarly to provisioning templates or partition tables, for more details see Job Templates section.
The command can be executed on multiple servers at once while specific parts of it can vary per host - in other words you can use variables in your commands. Variable values can be filled by given host fact, smart class parameter, smart variable or even host parameter. Last but not least, the value can be specified by user when he or she triggers the execution.
Few examples of tasks that this plugins helps you to achieve
- install/update/remove package
- bootstrap configuration management agent
- trigger Puppet/Salt/Chef/… run
1.1 Components
The whole remote execution system is pluggable, making it easy to add more providers of communication later. Therefore it’s split into several components that must be installed on Foreman and Foreman proxy.
| Plugin | Description |
|---|---|
| foreman_remote_execution | Required, contains the UI part and currently also SSH provider, depends on foreman-tasks |
| foreman_tasks | Required, keep status of all executed commands, allows debugging if something goes wrong |
| smart_proxy_remote_execution_ssh | Smart proxy plugin, required for using SSH provider, proxies the communication between Foreman and hosts, requires smart_proxy_dynflow |
| smart_proxy_dynflow | Smart proxy plugin, runs the jobs asynchronously and keeps status of commands executed via this proxy. This plugins uses relational SQL DB (sqlite). |
Each component is packaged for platforms that Foreman is officially packaged for. Since both Foreman and Smart proxy plugins requires Dynflow, Ruby 1.9+ is required. Foreman 1.9+ should be compatible with 0.0.* versions.
2. Installation
This chapter covers clean Foreman and plugins installation from nightly repositories on CentOS 7.1. We assume smart proxy being installed on the same host, it’s not requirement though. Please adapt according to your needs.
Start by installing Foreman nightly repository and EPEL7, see Quickstart instructions and Foreman manual for more information.
Foreman 1.10 and later
You can install both the Foreman and Smart Proxy plugin with the installer:
foreman-installer --enable-foreman-plugin-remote-execution --enable-foreman-proxy-plugin-remote-execution-ssh
Foreman 1.9 and earlier
Run foreman-installer and let it install foreman-tasks plugin
foreman-installer --enable-foreman-plugin-tasks
After it sucessfully finishes you’ll have to manually install plugins by following command
yum install ruby193-rubygem-foreman_remote_execution rubygem-smart_proxy_remote_execution_ssh
Next you have to setup ssh keys. By default smart proxy loads the key
from /usr/share/foreman-proxy/.ssh/id_rsa_foreman_proxy and use root
user on target host. To customize it you can edit the configuration in
/etc/foreman-proxy/config/settings.d/remote_execution_ssh.yml. Without
customization you need to create new ssh key and distribute it to
target hosts. The key must not use passphrase.
To generate a key, run following command on the host where Smart proxy runs
mkdir ~foreman-proxy/.ssh
chown foreman-proxy ~foreman-proxy/.ssh
sudo -u foreman-proxy ssh-keygen -f ~foreman-proxy/.ssh/id_rsa_foreman_proxy -N ''
When using SELinux make sure the directory and the files have correct labels of ssh_home_t. If not, restore the context:
restorecon -RvF ~foreman-proxy/.ssh
Don’t forget to restart Foreman, Smart proxy and Foreman tasks so plugins are loaded
service httpd restart
service foreman-tasks restart
service foreman-proxy restart
Finally, you have to refresh the Smart proxy features in the Foreman: Dynflow and Ssh should appear there as new features of the Smart proxy.
2.1 Remote Hosts Configuration
Now you have to distribute the generated key to all potential targets, e.g.
ssh-copy-id -i ~foreman-proxy/.ssh/id_rsa_foreman_proxy.pub root@target.example.com
Alternatively, the Foreman proxy publishes the public key it over the API, so that one can just download it into authorized keys:
curl https://myproxy.example.com:8443/ssh/pubkey >> ~/.ssh/authorized_keys
For the execution to work, the client needs to have openssh-server installed and configured. Also, openssh-clients need to be present, in order to scp to work (which we use for getting the scripts to the remote host)
3. Usage
After installation you can start preparing your commands and run them on your hosts. Every command must be defined as a Job Template. Once defined it can be executed multiple times. Let’s start with the definition first.
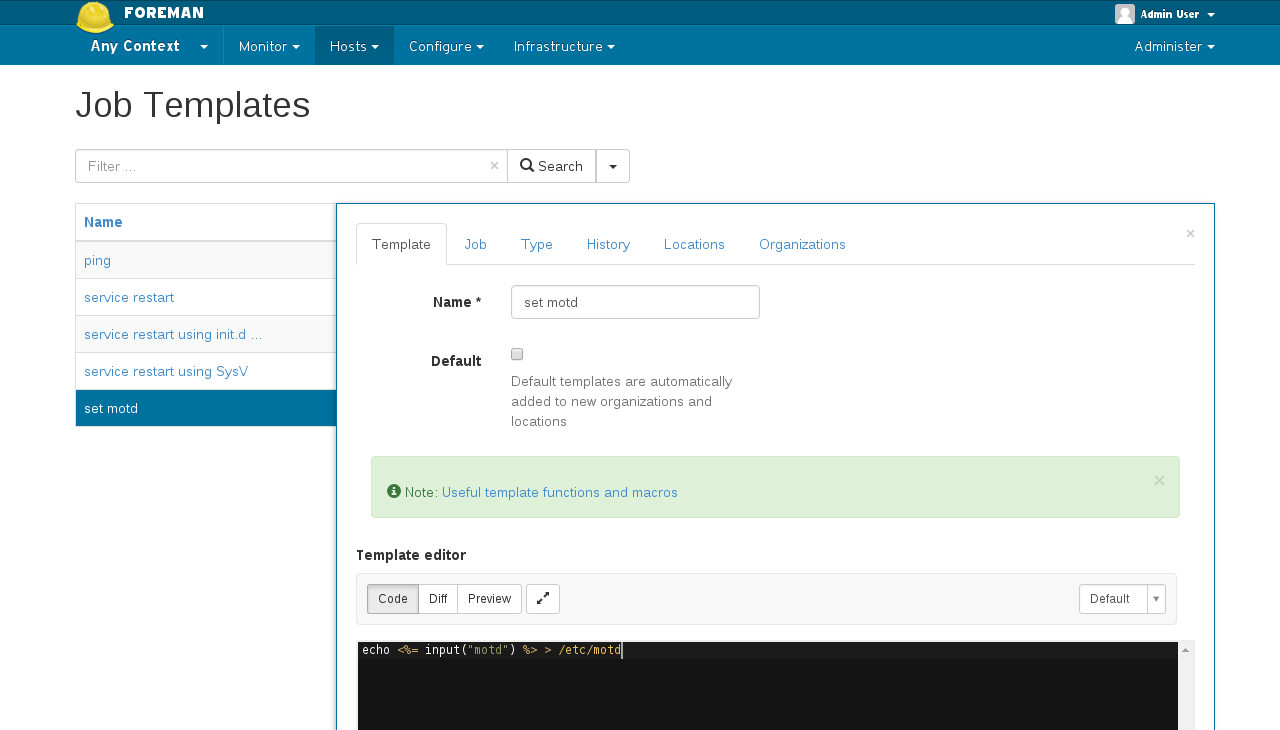
3.1 Job Templates
If you’re familiar with Foreman provisioning templates, you should find writing job templates familiar. First navigate to Host > Job Templates (new menu entry). Then hit the green button with label “New Job Template”.
Note: If you don’t see menu entry, the Foreman plugin is not installed correctly.
Now you should see form similar to Provisioning template one. In first tab you have to fill in Name. You can use input macros in ERB tags which stands for variables which you define in second tab called Job.
Before we get to inputs, lets look at other fields in Job tab. First
one is autocomplete field Job name. This is generic name of the
Job, which might be implemented by more Job Templates: for example one
template can use use yum to install packages while second one uses
dnf. Job name should be “install package” for both, while
Name attributes would be something like “install package using
yum” and “install package using dnf”. This will become more handy when
there are more than one Provider type. Provider type is
another attribute which you don’t have to change unless you install
additional connection provider plugins. If you’re unsure about the
difference between Name and Job name, you can keep both the
same, later you’ll be using Job name to select which job you want
to execute.
On the very same tab you can configure inputs. These template inputs defines values that can be accessed in the template code by input macros based on it’s name. To add new input, click green button “+ Add Input” which add more fields to the form. To remove the input, hit the cross in top right corner of the input form.
We support four types of inputs. Each must have it’s name which is used in macro. Let’s say my input has name “motd”, I can then use following ERB tag in my template code
echo "<%= input('motd') -%>" > /etc/motd
When template is rendered for particular host, the input('motd') is
evaluated like this:
- find and input with name motd
- determine its type
- based on type, fetch the value
As you probably realized, the way how we determine the input value differes based on Input type. Let’s start with User input. This input always need the value to be specified by user. It means when user runs the job, we display the field that he or she must fill in. Provided value will be used as a result for the corresponding input macro. Whatever you put in Description field will be displayed to the user so he knows what’s the purpose of this input.
Rest of types loads values from host and do not require any user interaction. Since the template is always rendered for specific host on which the job is executed we load the value this host data. These data can be either Fact (coming from Puppet/Salt/Chef), smart class parameter (when you use Foreman as Puppet/Salt ENC), smart variable or parameter.
If you want to load value from host facts, use Fact value input type. You’ll have to specify the Fact name so Foreman can match the right fact. If you make a mistake or the fact is not present for a given host, the rendering of template will fail and hence the execution on this host will fail.
If you want to use value from smart class parameter, use Puppet
parameter input type. you’ll have to specify puppet class name and the
name of its parameter. It’s the value that you can see in ENC YAML
under classes key.
If you want to use either smart variable or parameter, use Variable
input type. Both these values are part of ENC YAML under parameters
key overiding each other if they have same name. You have to specify
the name of either parameter or smart variable.
If you’re confused about the difference between smart class parameter, smart variable and parameter, checkout Foreman manual parameters section
Note that until inputs are saved the preview of template won’t work. To review the template first save it and then get back to the form and hit Preview button.
3.2 Executing a Job
You can execute existing Job if it has at least one Job Template that implements it from various places. One way is to go to host detail page and click green “Run Job” button. Other way is to select multiple hosts in host list page and select multiple action Run Job. Both ways will redirect you to New Job Invocation form.
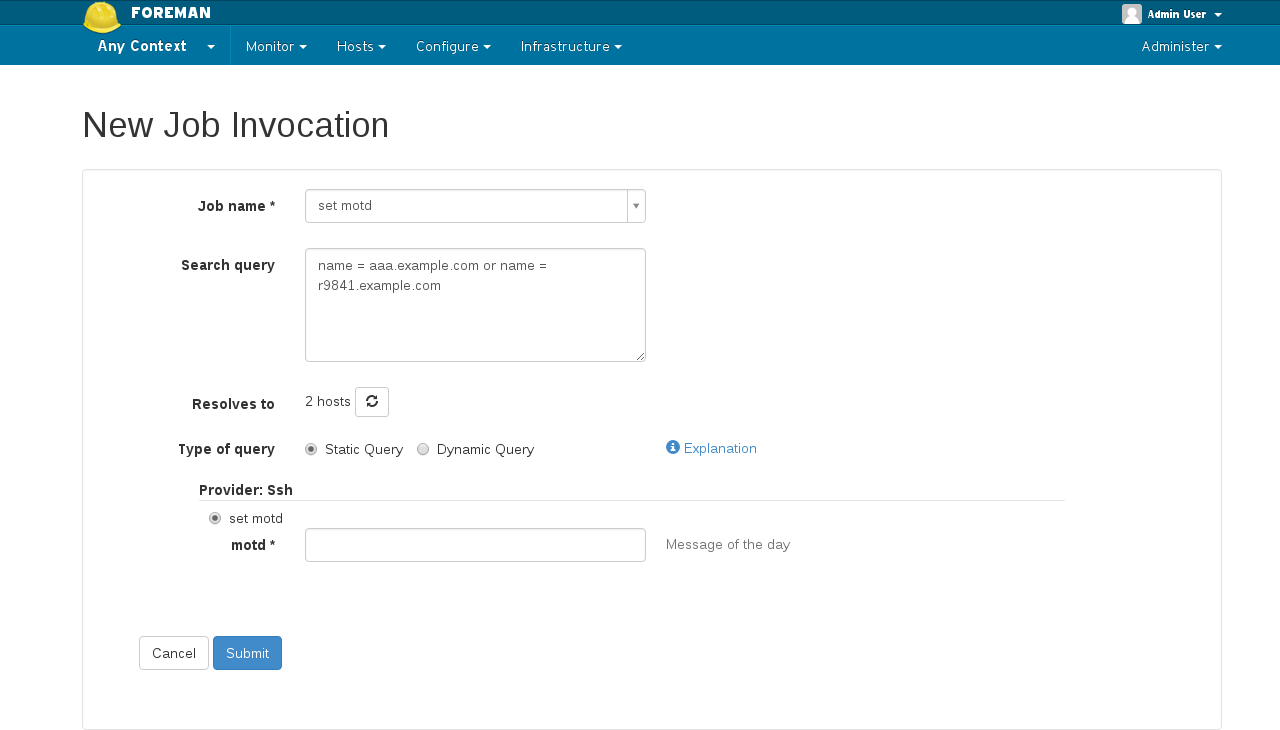
In this form you select which Job name you want to run on selected host(s). Then you can see prefilled Search query that uses the Foreman searching syntax. You can customize the query to search any set of hosts, e.g. all hosts running CentOS 7.1 or hosts with 1 GB memory. You can check how many hosts such search query covers by clicking refresh button below.
You can also specify Type of query. Currently we support two options
- Static query - evaluates the search query immediately when you hit the Submit button and saves the resulting set as the target of this execution
- Dynamic query - stores the search query and does the evaluation just before the command is executed, which means if there are new hosts added meanwhile, the job will be executed on them as well
Dynamic query will be more powerful when we add scheduling job executions in future. Also it will be useful when Bookmark is used for specifying the targets. Unfortunatelly there’s no UI for this yet.
Then there’s the template selection. If you have multiple job templates for a given Job name you’ll have to select one. If there’s just one like in my example, you’ll just have to provide values for all user inputs. After submiting the form, you’re redirected to the Job detail.
3.3 Job detail
On Job detail page you can see overall progress and result of the job execution.
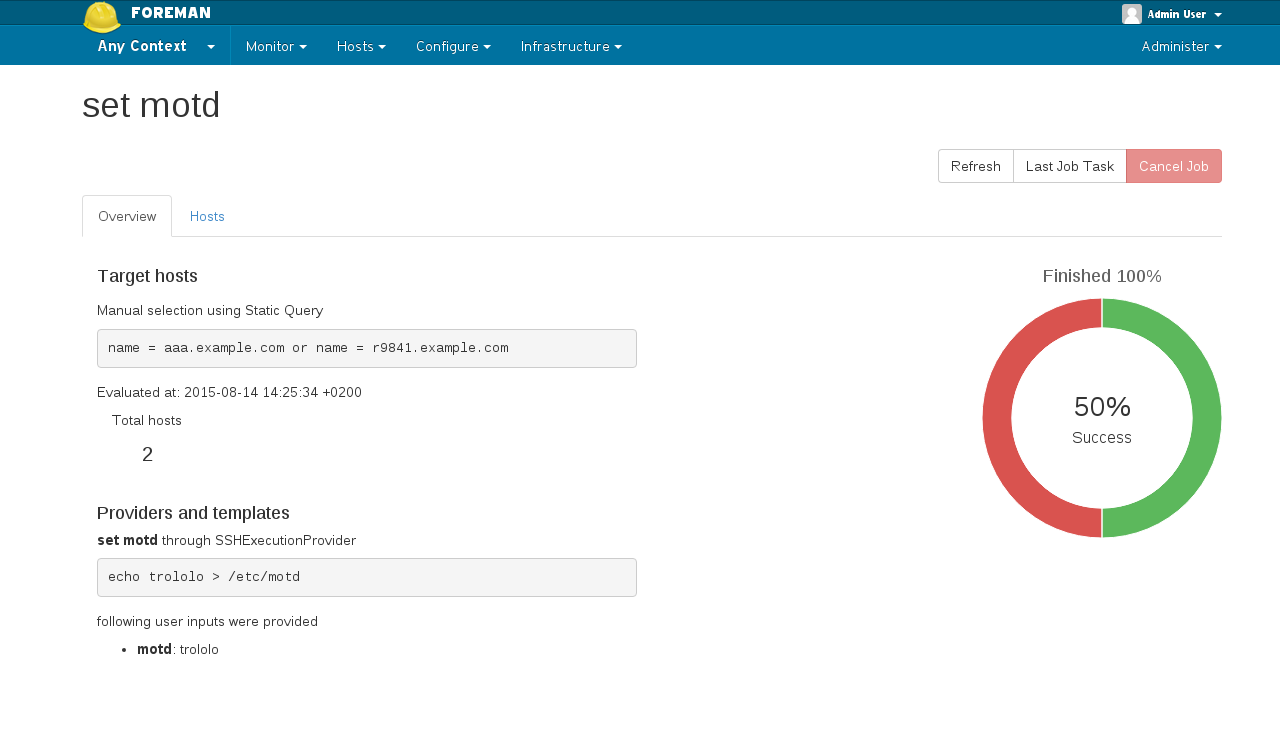
In overview tab you can see what query was used to find the hosts and how many hosts were found using it. Below is the evaluated template in generic form. If there were some fact or parameter inputs used, you will see only placeholders for them since they are specific to each host. User inputs are evaluated since they are same for all hosts. A chart is showing the status of the job on all targets.
From this screen you can even cancel the job if it’s not finished yet. First cancel attempt will try to cancel the run on Smart proxy. If proxy does not respond, you can hit the cancel button second time which forces the Job to be cancelled on Foreman (while it still might be running on Smart proxy). Last Job Task takes you to Foreman Tasks that represents this Job.
In Hosts tab you can see all hosts targeted by this execution, status of the job on them and link to Foreman Task that represent the execution for a particular host. Note that this task is a subtask of a whole Job task.
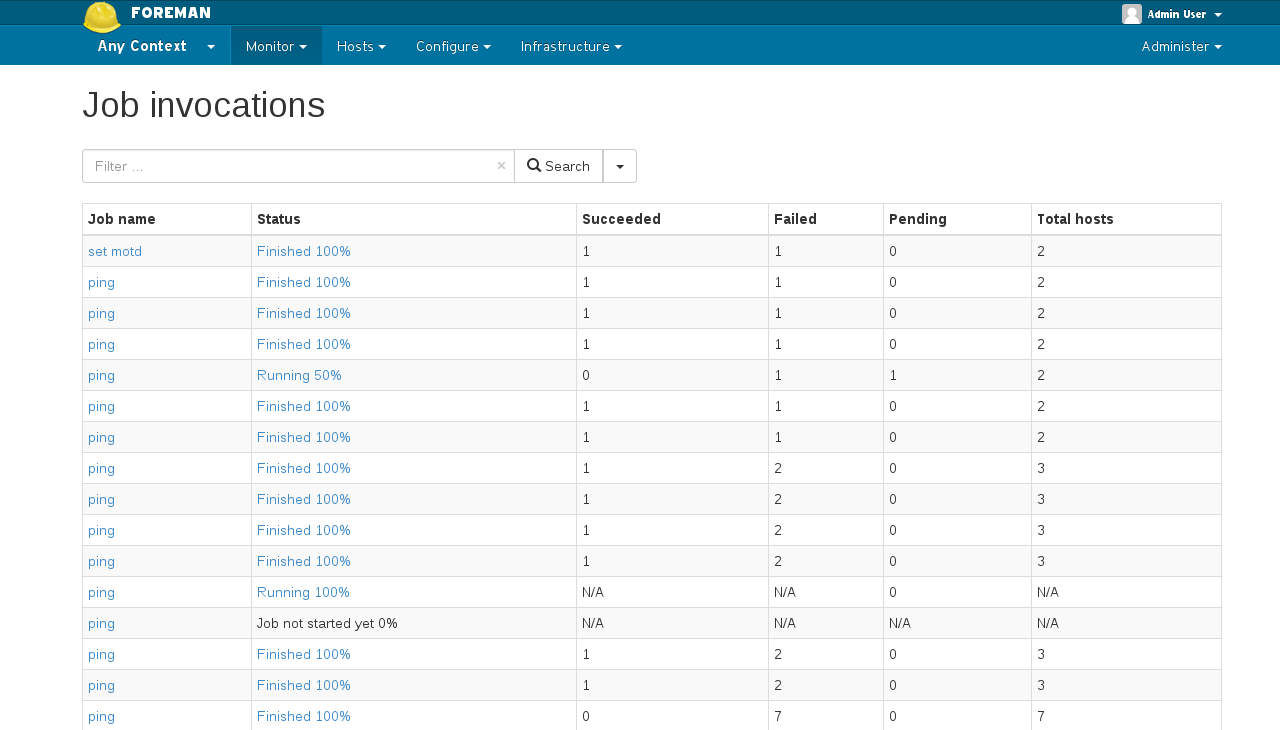
3.4 Jobs list
You can find all Jobs when you navigate to Monitor > Jobs. A table lists all jobs from history to future. You can search jobs by Job name with a queries like
job_name ~ set*
This example would find all executions that run job which names starts with “set”.
4. Advanced topics
In this section we try to explain how do things work behind the scene.
4.1 Determining the smart proxy for host
In order to perform the job on a host, there needs to be a Smart proxy available to do the job. Also, not all proxies can be used for all hosts in the infrastructure (due to possible network isolation).
For now, we search for the proxy among the proxies that are assigned to the host: either directly (e.g. puppet master…) or via subnets (e.g. dhcp…). The reason for this is to make the initial setup for the remote execution plugin as easy as possible.
In case of a fresh infrastructure, where no proxies are assigned to the hosts whatsoever, one can enable remote_execution_global_proxy setting. When turned on, the algorithm will fallback to the first available Smart proxy with required remote execution feature. This is useful for simpler infrastructure, as well as for testing purposes.
In future, it’s possible there will be more sophisticated mechanism available for determining the Smart proxy to use, especially in the multi-providers scenario.
4.1 SSH authentication and keys
The Smart proxy needs to be provided with a key to be used against the remote hosts (see Installation instructions for details). The remote hosts need to be configured to accept the private key that the smart proxy is using.
In future versions, it will be possible to provide the target hosts public keys or obtain them through available config management system facts.
For now, the root is used as the user to access the remote hosts. It
will be possible to change this in later versions. Also, the user to
actually run the script will be configurable on per-job basis.
5. Help
Please follow our standard procedures and contacts.
6. Getting involved
6.1 Troubleshooting
If you find a bug, please file it in Redmine.
See the troubleshooting section in the Foreman manual for more info.
6.2 Contributing
Follow the same process as Foreman for contributing.
7. Links
- foreman_remote_execution plugin https://github.com/theforeman/foreman_remote_execution
- foreman-tasks plugin https://github.com/theforeman/foreman-tasks
- smart_proxy_remote_execution_ssh https://github.com/theforeman/smart_proxy_remote_execution_ssh
- smart_proxy_dynflow https://github.com/theforeman/smart_proxy_dynflow
- issue tracker http://projects.theforeman.org/projects/foreman_remote_execution